Flash Hole /
Primer Pockets
“Good
enough.” Those are words that you’ll never hear from a serious silhouette
shooter. Every competition shooter, no matter what the sport, wants to
wring every last .001 of an inch in accuracy out of their loads as
possible.
However, there are so many variables in shooting that we have absolutely
no control over (wind, mirage, sun angles and brightness, background,
etc.) that one can only wonder how we do the things that we do as well as
we do them. The reason a serious shooter can accomplish those things is
because they spend copious amounts of time, money, and energy on the
variables that they can control - particularly when it concerns their
loads.
One of the more esoteric procedures that a careful competition shooter
will use in preparing their loads will be flash hole reaming. It’s no
secret that the flash holes found in our cartridge cases often leave
something to be desired as far as precision is concerned. In fact, I’ve
seen flash holes on some lots of brass where it seemed like they were just
a casual afterthought. For instance, I remember one lot of brass
where the flash holes were elliptical. Another where several of the holes
were undersized to the point that the de-capping rod of my sizing die got
jammed in the hole, and when I lowered the ram of my press, the rod was
literally pulled out of the die. Then there are the cartridge cases where
a burr is formed around the flash hole on the inside by the hole punching
or drilling process. Any one of these three conditions>
-
1. Misshapen/out
of round hole
-
2. Undersized hole
-
3. Burr around hole
can cause
distorted flame patterns from the primer and in turn, distorted ignition.
However, put all three conditions together and you’ve got trouble for
sure. Ever have a situation when you were shooting a known, accurate load
and everything was lined up perfectly and the shot ends up going off into
the boonies? The three conditions outlined above could very well have
played a factor in the miss. The point here is that we want perfect
consistency in our loads when shooting silhouette competition.
There
are a lot of tools available in all kinds of price ranges that will help
us do this job and I’ve used a number of them. As a result, I’ve formed
some definite ideas about what makes a good flash hole de-burring tool and
what doesn’t.
First
of all, I like those with a decent sized handle. I own some that are
nothing more than a little metal spindle with a little plastic electrical
insulator cap glued on the end for a “handle”. These itty, bitty tools are
hard to handle and have no torque at all when you’re trying to ream out a
stubborn burr or an undersized hole. Another problem is the fact that it’s
impossible to perfectly align the tool with the flash hole. This is
important because we don’t want to end up canting the hole to the side
when we ream it out. Now some of these tools will have a little sliding
cone on the spindle that rests on the case mouth to center it with the
flash hole. This is a step in the right direction but even so, because the
tool is so small that holding the case, the tool, and keeping the cone in
line is very awkward. I find it to be somewhat difficult to handle the
whole mess. No, there’s nothing like a decent sized handle to give you a
good grip.
Another
feature that I really like is a pilot rather than a cone on the cutting
rod. A pilot is a guide that precisely fits into the neck of the case and
will hold the cutting rod in perfect alignment with the flash hole. This
insures that the hole will be cut true and straight. Pilots will also
feature a set screw to lock them in place on the cutting rod. This also
allows you to control the depth of the cut. This is a valuable feature as
you want to go down just enough to get rid of any burrs, uniform the size
of the hole, and perhaps put a slight bevel around the flash hole, but no
deeper. We don’t want to compromise the strength of the case by going too
deep.
|
 |
|
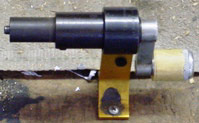
"Primer pockets
can be quickly uniformed with a crank type tool." |
|
Sinclair International, my favorite source of precision reloading tools
has just come out with flash hole reaming tool that has these features.
The handle is
made of green plastic and is of an anti roll type design. In other words,
if you place it on an inclined surface, it won’t roll off. Most
importantly, it’s just under an inch in diameter and therefore gives a
decent grip to the hand. At the base of the handle is what appeared to be
a sliding steel collar with a set screw. At first I thought this was a
sliding stop to set the depth of the reamer cut. I quickly discovered that
the collar was fixed to the handle and actually was holding the cutter rod
in place in the handle. When I backed out the set screw and removed the
rod from the handle, I found that the other end of the rod sported another
reamer blade as a spare.
The
steel pilots are what really sets this tool apart. They are made in house
by Sinclair and are available in a wide variety of diameters. The
workmanship is very good. They slip on the cutter rod and then are
fastened in place with a set screw. The thing that impressed me the most
about the pilots was the fact that they are precisely sized to fit into
the neck of a new un-sized cartridge case.
I
tried the pilots in four different types of cases (224, 6mm, 7mm, and 357)
and the fit was perfect with absolutely no looseness and only the very
slightest hint of drag when being inserted. In other words, it was a
perfect fit. Another thing that impressed me was the fact that the portion
of the pilot that fitted into the case neck was nice and long i.e. just
under a half inch and therefore is a very deep, secure fit. This insures
that the cutting rod will be properly lined up with the flash hole and
can’t slip around on the case mouth like one of those cones.
The
bottom line here is that the Sinclair flash hole tool is a high quality
product that will last a lifetime and allows you to do this valuable task
easily and quickly. The pilots are sold separately so you can buy just the
ones that you need.
|
 |
|
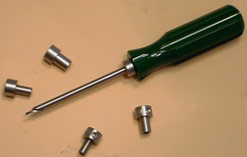
"The Sinclair flash
hole reamer is a high quality tool and makes quick work of the job." |
|
While
we’re talking about what goes on at the rear of the case, let’s discuss primer
pockets. As you might guess, primer pockets are one of those things that most
people take for granted. They’re just there. You stick a primer in and you
forget about it. Well, yes and no.
Again,
primer pockets get no respect and yet they’re a very important part of the
case’s ignition system. The fact of life is that the depth of primer pockets,
more often than not, will vary significantly, with most being shallow, while
others will be in spec and therefore significantly deeper. Additionally, they
will sometimes be off kilter as well i.e. be higher on one side than the
other. Another very common situation is the fact that the inside edges of
almost all primer pockets are rounded rather than square. To add insult to
injury, the bottoms of the pockets are almost never flat, but actually will be
concave to varying degrees.
So why
should we care? Basically, there are three reason why we should care.
Ignition. Ignition. Ignition. Primers are designed and built on the
assumption that they’re going to be sitting on a perfectly flat surface.
Obviously with run of the mill primer pockets there’s almost a 100% chance
that’s just not going to happen. Without a uniform and flat primer pocket,
it’s almost impossible to get the best primer ignition. Without uniform primer
ignition, we’ll get irregular powder burning, and with irregular powder
burning we’ll get larger groups. So why’s that?
Simply
because when a primer is seated high, low, canted, or not firmly bottomed out
in the pocket, it will receive irregular amounts of force when struck by the
firing pin. If not bottomed out, it could even move forward slightly,
cushioning the blow somewhat. In fact, it’s been shown that the force of the
firing pin blow in these very common situations can vary as much as 20%.
Result? Inconsistent ignition and bigger groups. So what do we do?
We have to
use a uniforming tool to reshape the pockets into a proper shape. The tools
come in three general categories: hand, crank powered, or power screw driver
powered. Again, there are several sources for these tools but, as you guessed,
I like Sinclair International for these kinds of products. They have their own
in house tools and they also sell quality tools from others as well. For a
small number of cases (50 or under) a hand tool is fine. Make sure it has a
decent handle on it though for ease of use and sufficient torque with minimal
effort. For 50-100 cases, I use a Forster hand crank set up with a Sinclair
cutting tool mounted. This operates something like a manual pencil sharpener
and does the job pretty fast. One thing though, the Foster crank handle has a
knurled knob which kind of rubs the side of my forefinger raw with extended
use. Consequently, I wrapped some tape around the rough knurling thus proving
a smooth surface. Situation remedied. When working with over a hundred cases,
a power screw driver goes a long way to make this tedious job bearable.
So there it
is. Like with spotting scopes, we tend to pay the most attention to what’s
going on up at the front . We’ll lock in on the size of the objective lens,
the coatings, etc. and pay no attention on the characteristics of the eyepiece
back at the rear - a huge mistake. With our cases, we’ll trim them them up
front, chamfer the mouth, uniform the necks, etc. and then will often ignore
the components of their ignition system located in the rear i.e. the flash
holes and the primer pockets. If we want to wring the most accuracy out of our
loads, an investment of a few more moments of our time will bring a
significant reward.
Small
Arms Production
I recently
received a very interesting Industry Intelligence Report from the National
Shooting Sports Foundation, the industry trade group that represents the
shooting industry in the U.S. They also sponsor the industry’s annual Shot
Show. The report was essentially a summary of arms production in the United
States with 2004 being the most recent figures available. Here’s a couple of
interesting facts drawn from the report.
-
1. Rifles accounted for
43% of firearms production
-
2. Shotguns = 24%
-
3. Pistols (semi autos
& single shots) = 24%
-
4. Revolvers = 9%
-
5. The greatest number
of handgun imports were from Austria.
-
6. The greatest number
of shotgun imports were from Italy.
-
7. The greatest number
of rifle imports were from Canada.
Handgun
production figures were also very interesting. These are just a few numbers
from some of the manufacturers that most silhouette shooters are familiar
with. There were a total of 48 manufacturers listed in the report. I was very
surprised that the vast majority of the listed manufacturers were companies
that I had never heard of and who were producing a very significant number of
handguns. Perhaps the name of the company and the brand name of their product
were different.
-
Smith & Wesson - 235,616
-
Ruger - 189,312
-
Taurus - 12,248
-
Colt - 10,173
-
Dan Wesson - 1010
-
TC - 8,677
-
Freedom Arms - 825
Just as a point of
comparison, TC produced just over 45,000 long guns compared to its 8,677
handguns. Lastly, Remington is the largest manufacturer of firearms with 19.3%
of all produced, Ruger is second with 14.5%, and Smith & Wesson comes in third
- Buy American.
|
|